I love making these cheese balls for parties. The recipe could not be easier - you make a base cheese and butter mixture, divide it into 3 parts, and then add the other ingredients. You can make them a day before, and then coat them right before you serve them. One is Cheddar and Chutney, and it calls for chopped cranberries, which is great for Christmas time, but for summer I like to substitute dried tart cherries. The others are Goat Cheese and Scallion, coated with Parsley, and Roquefort and Shallot, coated with Toasted Walnuts. All of my favorite flavors, rolled (literally!) into one!
Showing posts with label Martha Stewart. Show all posts
Saturday, July 17, 2010
Tuesday, May 11, 2010
Making Whoopie
I was feeling nostalgic on Mother's Day, so I decided that instead of making my usual cupcakes, I would make Whoopie Pies.
For those who have not had these homey treats, they consist of two cookie-shaped cakes filled with creamy white vanilla frosting. Apparently they have Amish origins, and worked their way up the east coast. I remember eating them on summer trips to Maine - you can find them in just about every corner store. They're soft, sweet, simple and delicious - sort of like a cupcake's less sophisticated country cousin.
As far as the name, according to a couple of history accounts that I have read online, Amish women would pack them in their husbands' or kids' lunches, and when they were opened, the receiver would shout "Whoopie!"
Most of the recipes today call for marshmallow fluff as a key ingredient in the filling. Not having that on hand, I decided to do a peanut butter filled Whoopie Pie instead. I had some leftover buttermilk that I wanted to use up, so I used the Gourmet recipe for the cakes, and the Martha Stewart recipe for the filling.
They were a lot of fun to make and even more fun to share. The cool thing about them is that they are very easy to transport, either layered in a container, or individually wrapped in plastic wrap. To a baking adventure that's easy, delicious, and a link to memories of east coast summers, I say "whoopie!"
Wednesday, January 6, 2010
The Salad Stops Here
You really only need one good vinaigrette recipe. Once you have found the one you like, you can make it over and over, and never tire of it. I like to make mustard-jar sized amount which will last in the refrigerator about 2 weeks - infinitely better than bottled, and for so little effort.
As simple as it sounds, it's hard to find that one that's just right - not too oily, bitter, bland, peppery, herby, garlicy, etc. Well, I have found it now, and what a relief - thanks to a new cookbook called Mad Hungry, by Lucinda Scala Quinn (thank you to my friend Ann for recommending it). This is a wonderful book, full of everyday recipes that are easy enough to throw together on a whim - and friendly enough for multiple ages and palates. The sub-title: Feeding Men and Boys; Recipe Strategies and Survival Techniques (Bringing Back the Family Meal), says it all. She works for Martha Stewart, so you know this woman knows a thing or two about success in the kitchen.

The ingredients for are readily available in anyone's pantry, but it is the combination and measurements that make it perfect.
"Rose's Vinaigrette"
- 1 T. minced shallot or garlic
- 1 t. Dijon mustard
- 1 t. light brown sugar
- 3/4 t. coarse salt
- 1/4 t. freshly ground black pepper
- 1/4 t. Worcestershire sauce
- 2 1/2 T. red wine vinegar
- 2 T. fresh lemon juice
- 3/4 c. extra-virgin olive oil
In the bottom of a clean jar, mash together the shallot, mustard, brown sugar, salt, pepper, and Worcestershire sauce.
Pour in the vinegar, lemon juice and olive oil. Cover tightly and shake well to combine and emulsify.
Use immediately or store in the refrigerator.
Thursday, December 17, 2009
Christmas Cookies
This is my new favorite cookie. Yet another gem from Martha Stewart, called "Chewy Chocolate Gingerbread Cookies", they have all of the flavors of the season mixed into a wonderfully chewy/crunchy cookie. (Thank you to my friend Joanna for sending me the recipe). The recipe is not difficult, but it does involve a few steps which require time in between, so it's something best made the night before you need them - plus, they get better after one day in an airtight container.
The dough gets patted into a round and refrigerated for a few hours, and then rolled into balls and refrigerated again, before rolling the balls in sugar and baking. Again, easy enough method, just allow for ample time.
They are soooo good and look great, with a lovely cracking at the top. I was out of baking chocolate, so I just used semi-sweet chocolate chips, which worked fine. Perfect for gifting.
I had a bunch of walnuts, so I also made the Walnut Cream Cheese Cookies from my Martha Stewart Cookies book.
These are also very pretty and the recipe makes a ton, which is convenient because you can keep the logs of dough in the freezer for weeks. Then if someone pops by for coffee - you can have home baked cookies in minutes!
I had bought these inexpensive brown bags at the Container Store, which are great both for their size and the fact that they are coated on the inside to keep food from soiling the bag. What I did was stamp the bags with my red mitten rubber stamp, and wrap 3 of each cookie in parchment paper, and seal it up for gifts. You can't imagine how nice it feels to give someone homemade cookies in a festive bag, just because.
Friday, November 13, 2009
Cookie Monster
Chocolate Chip Cookies are sacred to me. I absolutely love them, and have sampled all different kinds, over and over. But truth be told, I have never found the right recipe to make them just the way I like them. Which is to say, flat and crisp, with a slightly chewy center. Sounds easy, right? Not so much, not for me anyway. I can't tell you how many batches of cookies I have made that are thick, cake-y and just not right. In fact, it's always been so disappointing to me that I pretty much stopped making them all together. Also, I do not like too many things in my chocolate chip cookies - nuts are fine sometimes, but I feel that with many of the bakery ones, there is way too much "stuff" crowded in there, and you can never taste the cookie.
Well, I was having a real craving for them the other night, so I pulled out my trusty Martha Stewart's Cookies book, and decided to try her recipe for "Thin and Crisp Chocolate Chip Cookies". They looked and sounded right, and I had this nice bag of Guittard chocolate chips just begging to be used, so once the butter softened, it was cookie time.
I am pleased to report that they were perfect! And now I know why - there is more butter and sugar and less flour than in a traditional chocolate chip cookie recipe, so it changes the consistency. Such a simple thing, but I am so glad to finally have a good recipe in my repertoire, that I just had to share.
One thing, if you make cookies, even just occasionally, it is well worth it to invest in a cookie scoop. Makes the cookies uniform size and with that nice professional looking roundness, and it's a lot less messy than using a spoon. This is my 1 T. size - I also have a 2 T. size that works for big cookies and cupcake batter. Those tools, a KitchenAid stand mixer, and parchment paper (or Silpat sheets), are a baker's best friends.
Thin & Crisp Chocolate Chip Cookies
- 2 1/4 C. all purpose flour
- 1/2 t. baking soda
- 1 1/4 C. (2 1/2 sticks) unsalted butter, room temperature
- 1 1/4 C. granulated sugar
- 3/4 C. packed light brown sugar
- 1 t. coarse salt
- 2 t. pure vanilla extract
- 2 large eggs
- 1/4 C. water
- 2 C. semisweet chocolate chips (about 12 oz.)
Whisk flour and baking soda in a bowl
Put butter and both sugars in the bowl of an electric mixer fitted with a paddle attachment; mix on medium until pale and fluffy, about 3 min
Reduce speed to low. Add salt, vanilla, eggs, and water; mix until combined, about 1 min
Add flour mixture; mix until just combined
Stir in chocolate chips
Drop heaping tablespoon size balls of dough about 2 in apart on baking sheets lined with parchment paper
Bake cookies, rotating sheets halfway through, until golden brown, about 20-25 min
Let cool on baking sheets on wire racks 1-2 min
Transfer cookies to racks to cool completely
Friday, October 16, 2009
Parsley, Sage, Rosemary and ...
Last month, I participated in the Slow Food Eat-In event on Labor Day, to support the Time for Lunch Campaign with a huge potluck lunch at the Civic Center.
On each table were some fresh potted herbs, to be taken home afterwards by the participants. I took home French Thyme, which is one of my favorites.
One day I noticed that the plant was getting very full, so I decided use some of the leaves to make cookies. This recipe is from Martha Stewart's book called Cookies, which always delights and never disappoints. These are the right combination of chewy/crunchy with great texture from the cornmeal and a savory/sweet, unusual flavor combination of thyme and currants.
I always have cellophane bags and ribbon handy to pack up cookies for friends - after all, the best part about making them (besides eating them), is sharing them.
Cornmeal Thyme Cookies
- 1 1/2 C. all-purpose flour
- 1 C. yellow cornmeal
- 1 t. baking soda
- 1/2 t. coarse salt
- 1 C. (2 sticks) unsalted butter, room temperature
- 1 1/4 C. sugar
- 2 large eggs
- 3/4 C. dried currants
- 1 T. plus 1/2 t. finely chopped fresh thyme
Preheat the oven to 350.
Whisk together flour, cornmeal, baking soda, and salt in a bowl.
Put the butter and sugar in the bowl of an electric mixer fitted with the paddle attachment. Mix on medium speed until pale and fluffy, about 3 minutes.
Mix in the eggs one at a time.
Reduce speed to low, mix in flour mixture until just combined
Mix in currants and thyme.
Drop rounded tablespoons of dough onto baking sheets lined with parchment paper, spacing 2 inches apart.
Bake until pale golden, 10 to 12 minutes.
Transfer cookies on parchment to wire racks, let cool.
Sunday, May 3, 2009
Life is a Just a Bowl of Sour Cherries

I love the combination of Chocolate and Cherries. In fact, the Chocolate Cherry Bonne Bell Lip Smacker was my all time favorite. So when I saw these Montmorency Dried Sour Cherries at Trader Joe's last week, I could not resist buying a package.
I wanted to make something using chocolate, so I picked the Chocolate Cherry Crumb Bars from the Martha Stewart "Cookies" book. As with all MS recipes, it was well laid out and worked like a charm. I used my Edge Brownie Pan instead of a 9" square pan, and used salted butter to grease the pan. I omitted Kirsch this time, but I will definitely use it next time. It's important to let the bars cool completely before cutting, or they will fall apart.
Chocolate Cherry Crumb Bars
1 1/4 cups dried cherries, chopped coarsely
2/3 cup water
2 1/2 sticks butter, set aside 2 tablespoons and cut the rest into small cubes
1 cup sugar
1/2 cup dutch cocoa powder
1 teaspoon salt
3/4 cup brown sugar, packed
1 cup unsweetened shredded coconut, lightly toasted
2 cups plus 7 1/2 teaspoons flour
1 egg
2 tablespoons kirsch
1/2 cup good quality chocolate chunks
Preheat oven to 350
Butter a 9" square pan, or line with parchment paper and lightly coat with cooking spray.
Place cherries, 2 tablespoons butter, 1/4 cup sugar and 2/3 cup water in a small saucepan and bring to a simmer over medium heat. Simmer, stirring occasionally, until the liquid has been almost all absorbed - about 15 minutes. Remove from heat and stir in 1/4 cup sugar. Let cool, giving a few stirs, until sugar has dissolved.
In a medium bowl, whisk together cocoa powder, salt, brown sugar, toasted coconut, and 2 cups flour. With a pastry blender, mix in the remaining cubed butter until it resembles coarse meal. Measure 3 lightly packed cups cocoa mixture and press into the lined 9" pan. Bake until just set, about 18-20 minutes.
Place egg, remaining 1/2 cup sugar, and kirsch into an electric mixer bowl. Mix on medium-high speed with the whisk attachment until pale, about 4 minutes. Gently fold in the cherry mixture and the remaining 2 1/2 teaspoons flour. Stir in chocolate chunks. Spread this mixture evenly over the set crust and then top with the reserved crumb cocoa mixture.
Bake until a toothpick inserted into the center comes out mostly clean - a few crumbs attached is okay - about 50 minutes. Let cool completely on a wire rack. Once cooled, cut into squares.
Thursday, March 26, 2009
Toasted Coconut Cupcakes With 7-Minute Frosting
For Jude's birthday, we decided that I would try a cupcake recipe from the February issue of Martha Stewart Living, which was all about cupcakes. The cake part was pretty good (reprinted below), but it was the 7-minute frosting that was challenging/fun part. All I can say, is thank God for my KitchenAid mixer, or I would never be able to make half of the stuff that I do. In honor of that fact, a bunch of us pitched in and got Jude a stand mixer of her own, so that she can experience the triumph of stiff peaks and whipped goodness that the rest of us do. Be warned, the 7-Minute Frosting takes a lot longer than 7 minutes, but it's gorgeous and worth the effort.
Coconut Cupcakes
Makes 24
- 1 3/4 cups all-purpose flour
- 2 teaspoons baking powder
- 1/2 teaspoon salt
- 1/2 cup packed sweetened shredded coconut
- 6 ounces (1 1/2 sticks) unsalted butter, softened
- 1 1/3 cups sugar
- 2 large eggs plus 2 large egg whites
- 3/4 cup unsweetened coconut milk
- 1 1/2 teaspoons pure vanilla extract
- Seven-Minute Frosting
- 1 1/3 cups large-flake unsweetened coconut*
Friday, October 31, 2008
Pumpkin Cupcakes
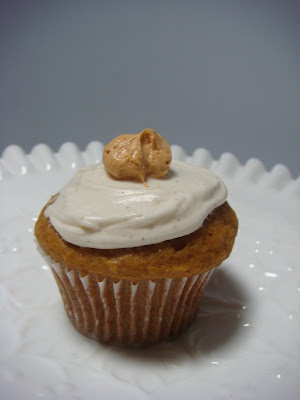
I am back in San Francisco, where Fall is in full swing, and I love anything and everything Pumpkin. This recipe for Pumpkin Cupcakes from Martha Stewart is easy, moist, and delicious. Add your favorite cream cheese frosting (I do 1 stick unsalted butter creamed with 1 8 oz pkg cream cheese, add 1 box powdered sugar and 1 T. vanilla bean paste, mix until glossy using a stand mixer). For a more festive touch, I piped on a dollop of pumpkin flavored cream cheese from Noah's Bagels. In order to make it look a little bit less like pumpkin poo, next time I will pipe it using a star tip.
Be sure to buy pumpkin puree and not pumpkin pie filling. As with most recipes, it says it makes 18 but it really makes 24-30.
Pumpkin Cupcakes
Ingredients:
2 C. all purpose flour
1 t. baking soda
1 t. baking powder
1 t. coarse salt
1 t. ground cinnamon
1 t. ground ginger
1/4 t. ground nutmeg
1/4 t. ground allspice
1 C. packed light brown sugar
1 C. granulated sugar
1 C. (2 sticks) unsalted butter, melted & cooled
4 large eggs, lightly beaten
1 can (15 oz.) pumpkin puree
- Preheat oven to 350 degrees. Line cupcake pans with paper liners.
- In a medium bowl, whisk together flour, baking soda, baking powder, salt, cinnamon, ginger, nutmeg, and allspice. Set aside.
- In a large bowl, whish together brown sugar, granulated sugar, butter, and eggs.
- Add dry ingredients and whisk until smooth. Whisk in pumpkin puree.
- Divide batter evenly among liners, filling each about halfway.
- Bake about 20-25 minutes.
- Transfer to a wire rack, let cool completely, then frost.
Saturday, May 31, 2008
Cookie Monster

I've been busy in the kitchen since I came home my trip. I decided to take a break from cupcakes, and try out my new book "Martha Stewart's Cookies". I had been wanting it ever since I made her recipe for financiers from the February issue of MS Living, and one day Charles picked it up for me as a very thoughtful (and somewhat self-serving?) gift.
Here are the financiers, which I made for an Oscar's Party, as a loose interpretation of "La Vie en Rose". They were very pretty, although the shape of the raspberry part was supposed to be a heart, which you make by dragging a chopstick through batter - not easy. They were a lot of work (you have to grind up the almonds that make the base of the batter, and make the raspberry puree from scratch), but worth it.
For my first recipe out of the book, I decided to try something totally homey and unfussy: Peanut Butter & Jelly bars. Both of us love PBJ, so it was a natural, and bars are so much more forgiving than cookies - plus I had most of the ingredients already. When they first came out of the oven, I thought that they were just ok, but after sitting for a day the flavors really developed and they turned out to be very good. I meant to give more of them away, but we found ourselves eating more than we planned! I used a nice Danish strawberry jam and regular Jif peanut butter - I have the all-natural kind in my pantry, but I don't think it would work well in this recipe.
Tonight, I made another recipe which was a little more difficult - Earl Grey Tea cookies. After mixing the dough (which included 9 bags of Earl Grey tea, a lot of butter, and orange zest), you are supposed to shape it into logs, wrap them in parchment paper, and stick each of them into a paper towel roll to freeze before cutting. I ended up with 2 totally different sized logs which wouldn't really form right, and then would not slice without crumbling when I took them out of the freezer. But the dough was so good that I just figured it out and made it work, sometimes having to spackle them together like slightly dried-out Play Doh. They're not uniform like the picture in the book, but they sure are tasty - like a shortbread cookie with a strong bergamot flavor. They would make a nice gift, wrapped in a cellophane bag and tied with a ribbon.
I'll share a cookie-making hint with you - most recipes call for unsalted butter in the batter, which is a given. However, I always use salted butter to grease the pan, especially for bar cookies or cakes, which gives the outside a little bit of extra flavor.
Next, I am ready to try something chocolate - stay tuned!
Subscribe to:
Posts (Atom)